| Panzer
Grenadier:
Under the Hood
By Matt Foster
March 2014
One of the keys
to grasping the Panzer
Grenadier game system,
and thus to enjoying the game, is understanding
what it is and what it isnt. As simple
as that might sound, it can be a subject
of great confusion to many veteran wargamers.
They approach what is perceived as a tactical
level game with a mix of preconceptions
that can limit their enjoyment of the system.
Speed, or more accurately pace, is the first
preconception wall that many
veteran players can hit. Most of the familiar
tactical-level games engage in some degree
of time compression, with scale turns
that represent one or two minutes. Scenarios
generally range from six to 15 turns in length,
with the average probably in the eight to
12 turn range. Now, anyone who has even a
passing familiarity with real military
operations should probably recognize that
events in those games proceed at an unrealistically
fast pace. It often makes for a tense, enjoyable
game, but asking an infantry company to clear
400 or 500 meters of urban terrain of enemy
forces in 10 minutes is hardly a realistic mission.
World War II artillery fire missions that
are called and resolved in 90 seconds exceed
any forward observers wildest fantasies.
You only need to look at a few slices of
those games (all of which are quite enjoyable)
to understand that they tremendously compress
the scale of time represented.
That degree of time compression is absent
from the Panzer
Grenadier system. One of the first
things you should note when flipping through
one of the PG scenario books is the length
of the scenarios. Measured strictly in turns, PG
scenarios are generally longer than scenarios
in other tactical system. The scenario highlighted
for discussion in this piece is Scenario
3 from Eastern
Front: "Fontana Alba." Its
30 turns in length. Thats 7.5 hours
of scale time, which is a fairly
typical game length in the PG system.
More than one veteran gamer has had a rough
go at wrapping his head around the concept
of a tactical game in which patience is often
a virtue. You dont necessarily have
all day to fiddle around in PG, but you generally
have the time you need to execute a fairly
realistically-paced battle plan. Time enough
to do some maneuvering. Time enough to let
your supporting arms (if you have them) do
some softening up work.
Panzer
Grenadier is not a game system that
generally rewards a rushed style of play.
Players who charge toward the enemy, pause
to fire off maybe one or two turns of direct
fire and then try to close for assault combat
will, more often than not, get handed their
heads.
Taking Ground
On the Direct Fire results table, casualty
rates are going to be pretty low as long
as youre taking shots on the 11 column
and anything lower. If youre accustomed
to playing tactical games where troops tend
to evaporate rapidly under fire, direct fire
in PG can come as a bit of a shock. Sometimes
you can stand off and blast away all day
and generate hardly any casualties.
The games direct fire model is morale-based,
not casualty-based. For the most part its
intended to reflect the disorganizing effects
of fire on a units capabilities. Direct
Fire (and Bombardment, for that matter) is
best used to disorder an enemy position (inflict
Disrupted and Demoralized results) before
you send your guys in for assault combat.
Assault combat is what takes the ground
and generates the higher casualty rates.
In most PG scenarios, you have to figure
out how to make assault work for you if youre
going to capture contested victory locations
and win the game. The Assault CRT is shorter
and bloodier.
But theres another catch that can
trip up the unwary gamer with expectations
carried over from other game systems. In
PG, assault is not a one-turn, win-or-run
knife fight. Be prepared to conduct and support
your assaults over a span of several turns.
Frequently, assault combats dont resolve
to a conclusion in a single activation. Keep
key leaders handy to support critical assaults,
and keep reserve platoons nearby (if you
have them) to reinforce assaults and keep
the pressure on when you have to pull out
reduced, disrupted and demoralized platoons.
Assault is, perhaps, the key mechanism players
need to master in order to get the most out
of their Panzer
Grenadier play. Getting your
attacking units into assault combat with
an enemy force is a crtical skill you have
to develop to win at PG. Organizing to support
and manage your assaults once your troops
have gotten stuck in is equally
important. As I mentioned above, running
into direct fire range of the enemy, popping
off a few shots and then trying to get stuck
into an assault hex seldom succeeds.
If you havent softened up the enemy
position by inflicting some disruptions and
demoralizations before you go charging in,
your guys can get cut to ribbons by defending
fire. Assault is a Fire action
that (except in the case of cavalry) can
only be initiated from an adjacent hex. That
means your assault force can get hit by opportunity
fire on the turn they move adjacent; and,
on the following turn, if you lose the initiative
youll get hit by the defenders direct
fire before you activate for the assault.
In both cases, youre taking fire
with some very nasty column shifts on the
CRT. Opportunity fire is +1 column, and youll
suffer a +2 additional shift for being adjacent
to the firing unit. Even a single, lowly
rifle platoon can inflict formidable punishment
with the maximum +3 column shift in its favor.
It gets even worse if the position you want
to assault contains multiple enemy units,
or heavier assets like machine gun platoons.
If its a multi-hex defending position
with a good leader at hand, you may also
be facing the coordinated opportunity fire
of multiple stacks of units.
Fontana Alba
For a quick example of this, try the opening
turns of Fontana Alba with the Romanians
in impatient mode. Theyre
cavalry, right? Just charge right on in there.
Pause a few hexes short of the city to spend
a couple of turns dropping 12-strength artillery
attacks on them. Then just sweep on into
the town for some assault combat. If you
can.
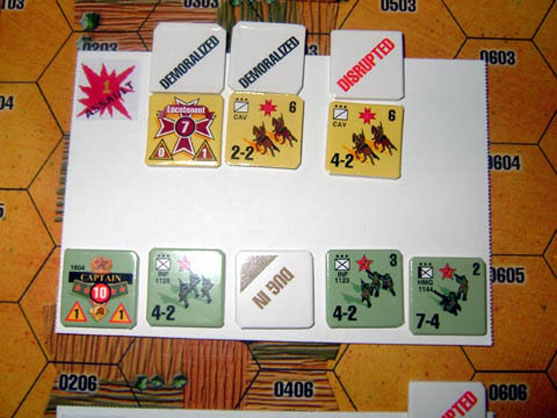
Chances are, the Romanian assault wont
do so well. Below is a photo of a Soviet
defense of the town. The two western-most
hexes each contain a rifle platoon (4-2)
and a machine-gun platoon (7-4). The northern
hex is two rifle platoons. The remaining
hex is the leader (in this case, a rather
good captain) and a reserve of three rifle
platoons.

The
proper placement and use of leaders is another
big key to enjoying Panzer
Grenadier. In this case, the captain
is situated to provide useful support to
every hex in the defense. His +1 morale bonus
can be used by every unit in town. He could
activate all of the units in town at once
if he desired. And any Romanians daffy enough
to attack from the south face the likelihood
of the captain acting to combine the fire
of four rifle platoons and a machine-gun
platoon.
In this particular setup, the Soviets obviously
benefit from the luck of the draw. The captain
(randomly selected before play) commanding
the defense is one of the best leaders in
the EFD countermix. The Soviets inferior
morale (7 vs. 8 for the Romanians) will stand
against them in assault combat but
with the 10-morale captain coordinating activations
and providing morale support with his bonus,
they stand a much better chance of inflicting
some pain on the Romanians as they attempt
to close for assault.
The Romanian task in this scenario is very
difficult. They have to capture the town
and hold it against a late-game counter-attack
to win the game. In order to do that, they
have to exploit a couple of razor-thin advantages.
First, they receive two 12-strength off-board
artillery attacks each turn. They must show
a little bit of patience and use their off-board
artilleryalong with their smattering
of on-board heavy weapons (two machine-gun
platoons and a 60mm mortar platoon) to
hit the defenders with some disruptions (and
maybe even demoralizations) before they assault
the town.
The excellent Soviet leader hunkered down
in the town makes disorganizing the defense
a tough chore. All Soviet morale checks get
a +1 boost, as do all recovery attempts.
In fact, its not a stretch to wonder
if having such a good leader in charge of
things might just make the Romanians mission
close to impossible.
Panzer
Grenadier scenarios that
don’t include lots of AFVs and transport — and
even some of them that do — have some
signature characteristics that players need
to understand in order to be successful. The next thing players need to consider
is the game’s use of space.
Frequently, a scenario will give you a deceptively
large amount of space to play. It’s
deceptive in that once you give the victory
conditions a good going-over, you’ll
often figure out that most of the action
is going to be concentrated in a fairly small
portion of the map. All of that space may
give you a number of initial options for
deployment and maneuver, but once the shooting
starts the area of the game map that’s
really important can narrow down very quickly.
My example scenario, Eastern
Front: "Fontana
Alba," is a case in point. Two maps present
a huge amount of territory for the number
of units involved. But the victory conditions
make it pretty clear that the four town
hexes are going to be the focus of the
game.
(Granted, if the Romanian player wants to
play for a draw from the outset he might
decide instead to occupy the woods to the
south of town, but our Romanians here are
playing to win, and thus have to capture
and hold the town. What kind of weenie starts
the game looking for a draw?)
How does all of this come together in the
game? Let’s take a look as "Fontana
Alba" plays out.
The Romanians have a few maneuver options — they
have to decide on a direction to approach
the town — but their goal is pretty
straightforward. They have to move on the
town, soften up the Soviet defense, and then
assault to clear out the defenders. They
have some time to accomplish this, but not
tons of time. The scenario is 30 turns in
length, but from the 13th turn (0900) out
there is an increasing chance that a Soviet
counter-attack will arrive.
In this case, the Romanians approach the
town quickly from the west and cross the
river. Their cavalry draws up three hexes
from the town. This is inside of the range
of the Soviet machine-gun platoons, but outside
of the two-hex range of the rifle platoons.
The three-hex range allows the Romanians
to spot enemy units in the town and begin
the process of trying to soften up the defense.
The “softening up” involves
bombardment fire from the Romanian off-board
artillery (two concentrations of 12-strength
fire), direct fire from their two 8-strength
machine-gun platoons (stacked to allow combined
fire), and “Hail Mary” bombardment
from their 5-strength 60mm mortar platoon.
The Russians respond with bombardment fire
from their own mortar platoon, which is located
in the woods south of town. There is an occasional
head-game as the two sides trade activations
and “passes,”, but the Soviet
machine-gun platoons in the town generally
don’t respond with direct fire. They
elect instead to hold their fire and await
a chance to use opportunity fire at a closer
range.
Ill-timed direct fire from the Russian defenders
could essentially give the Romanians a “free
pass” to an assault. As long as the
defense remains in pretty good order (not
a lot of disruption or demoralization results),
the prospect of taking opportunity fire with
a +3 column shift will generally persuade
the Romanians that an assault is a bad idea.
Softening up a defense can take time, though.
In this game, the morale boost of the Soviet
captain keeps the defense steadfast until
the 0800 turn, when the Romanian artillery
finally has an effect on the units in hex
1004. The machine-gun platoon in the hex
takes a disruption result and the rifle platoon
is demoralized, which at last gives the Romanians
an opening to assault without having to absorb
a huge amount of opportunity fire.
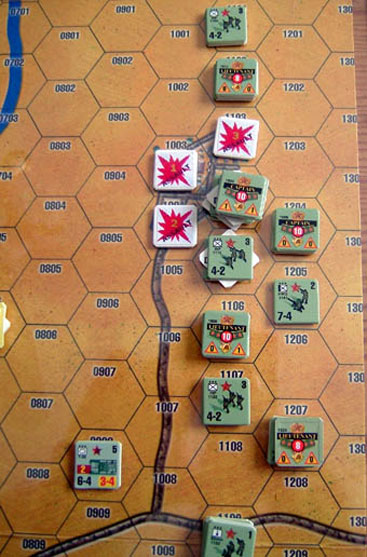
After their artillery strikes home, the
Romanians use follow-on activations to execute
a two-hex charge assault with some of their
cavalry. Opportunity fire from 1003 inflicts
a step loss on one cavalry platoon (which
then disrupts) and causes the Romanian 9-morale
locotenant to demoralize, but they have enough
troops that they can get a couple of platoons
into assault.
As I mentioned, in Panzer Grenadier assault is usually a multi-turn
process, and the attack on Fontana Alba is
no exception. The demoralized Soviet rifle
platoon fails to recover and flees to 1003,
but the Red captain feeds one of his reserve
platoons into 1004 to bolster the machine-gun
platoon.
In the 0815 and 0830 turns, the Romanians
work more troops into the assault, and also
manage to send in an assault on 1003.
Results can snowball pretty quickly in assault.
One or two bad morale rolls, or one or two
good enemy morale rolls, can cause the situation
in an assault hex to get out of control in
short order.
The Romanians and Soviets trade assault
results for several turns. Superior Romanian
morale and more numerous leadership help
them overcome the defensive bonus of the
town and they force a number of morale checks.
One unfortunate Soviet rifle platoon consistently
flunks its morale checks and ends up eliminated
after multiple failures result in two step
losses. But the Red machine-gun platoons
in particular prove impossible to shake (both
pass a couple of difficult “M2” checks).
In the 0830 and 0845 turns, the Soviets
suffer a total of three step losses in assault
and inflict two on the Romanians (giving
each side three step losses total). The Soviets
feed some reinforcements into the assault
hexes, though, and keep fighting while the
Romanians maneuver to bring support fires
to bear on the two hexes of the town that
aren’t under assault.
The wheels start to come off the Romanian
effort, though, in the 0900 turn. The Romanians
in 1004 totally whiff on their assault result,
while the Soviet defenders score a “1” against
them in return. Both sides score “M2” results
in assault in 1003, and the Romanians consistently
flub their morale checks while the Soviets
pass more than their share.
The additional step loss drops Romanian
initiative to “1” in the 0915
turn and they lose the initiative roll. The
Soviet captain defending the town then personally
leads a counter-attack into 1003, which contains
(at the start of the turn) a disrupted Romanian
leader, a disrupted Romanian cavalry platoon,
and two demoralized full-strength cavalry
platoons.
The Soviets score a “1” result
and the Romanians elect to reduce one of
the demoralized platoons. The Romanian leader
passes his morale check, but all three combat
units fail. This results in two additional
step losses from the two demoralized units
(who both failed their checks by three or
more) and the disruption of the third platoon
as well.
Figuring in the results from the assault
in 1004, by the end of the 0915 turn the
Romanians have lost seven steps against the
Russians’ four. They have no good-order
units remaining in 1003, which is held only
by a disrupted leader and one disrupted platoon
after all of the recovery rolls.
The Reds begin rolling for their counter-attack
on turn 13 (0900). They have to roll a “6” on
a single die to receive their reinforcements.
Each hour (four turns), the score needed
to trigger the reinforcments increases by
one. In this case, they roll a “5” on
turn 19 and the counterattack sweeps onto
the board.
By the time the counter-attack goes in,
the Romanians have managed to contest three
of the four hexes of Fontana Alba with assaulting
units. The Soviet task at this point largely
consists of trying to winkle the Romanians
out of those assault hexes.
Sweeping away the few Romanian units that
remain outside of the town isn’t a
terribly difficult task. The stack of two
Romanian machine-gun platoons close to the
river bridge gets pounded to dust by the
Soviet off-board artillery (3 x 10-point
concentrations) and by the three Soviet on-map
mortar platoons, before falling victim to
a company-sized assault in fairly short order.
The remainder of the game then boils down
to the Soviets managing their assaults against
the three town hexes while the Romanians
can do little more than hunker down and try
to hang on by their fingernails.
The northernmost town hex is cleared in
a couple of turns, as the two reduced cavalry
platoons there lack any stamina at all in
the face of a company-sized assault. Romanians
in the other two town hexes cling grimly
to their positions, but without reinforcements
and with no place else to hide, they can
only do so much.
It’s a close-run thing, but the Soviets
finally manage to clear out the last of the
Romanians with one turn remaining in the
game.
Had the Romanians suffered slightly lighter
casualties in their initial attacks on the
town — say, two fewer step losses — they
likely would have had sufficient strength
to hang on in at least one of the assault
hexes and force a draw. As it played out,
however, the large Soviet counter-attack — aided
considerably by good Soviet leadership draws — was
simply too much for the Romanians.
Click
here to order Eastern
Front today. |