| Second World War at Sea:
Carrier Operations, Part Three
By Robin Rathbun
April 2023
 Note: This is the third installment of this look into the nuts and bolts of carrier operations (Rule One: Leave no nuts or bolts on the deck.). The series began here and continued here. Note: This is the third installment of this look into the nuts and bolts of carrier operations (Rule One: Leave no nuts or bolts on the deck.). The series began here and continued here.
Task Force Defense: CAP
In all navies, the primary defense against enemy air attack was the Combat Air Patrol, or CAP.
In the U.S. and Royal Navies, the basic CAP element was the two-plane section. Two sections formed a division. Early in the war (up until the Battle of the Coral Sea), SBD Dauntlesses supplemented the fighters in the CAP role. They were kept low, intended as a defense against torpedo bombers.
The CAP was radar-directed. A fighter director for each task force stationed and directed the CAP. Once an incoming strike was detected, depending on the situation a section or one or more divisions of planes would be vectored out to intercept. Radar direction enabled the CAP to intercept strikes farther from the task force, allowing more time for the fighters to break up and attrite them. A major shortcoming of the system was the inability to reliably determine the altitude of incoming strikes. CAP at times missed strikes by being either too low or too high.
The British, with their longer experience in radar direction, started out well ahead of the Americans, but the two navies readily traded information and personnel and the USN proved to be quick learners. The U.S. system had some serious teething problems with coordination and radio discipline early in the war, but its much greater potential was largely realized by the Battle of the Philippine Sea. There, radar-directed CAP decimated the Japanese strikes before they ever saw the American ships. In the Okinawa campaign, intercepts were pushed even farther from the task forces by using fighter directors aboard destroyers acting as radar picket ships.
The IJN never did develop radar direction the way that the RN and USN did. This was due to several factors, including the late development of radar and the unreliability of Japanese radios. Most fighter pilots preferred to save the weight of a radio to extend their range or improve their maneuverability. The CAP relied on visual spotting by the escorts and patrolling fighters. Even when air search radar was developed, it was used for early warning and to cue the visual lookouts or CAP aircraft as to the direction to search for incoming strikes.

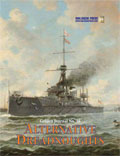
An F4F-3 Wildcat fighter, seen in early 1942.
Japanese CAP used the usual three-plane shotai as the basic element. Fighters were stationed over the screen, close to the carrier. Destroyers were stationed at the edges of the screen some distance from the task force, each covering a possible attack sector. The destroyers would attract the attention of the CAP using smoke or flares, and indicate the direction of incoming aircraft by firing guns in their direction. Once the fighters spotted incoming aircraft, they would handle their own interception. The system was prone to breakdown, as fighters tended to gang up on the first flight spotted and, once engaged, often missed signals of new attacks.
American and British radar gave them another advantage in task force defense. The radar would often pick up incoming raids far enough away to enable the carriers to clear their decks. It was standard procedure for American carriers to launch all flyable aircraft to clear the ship of flammable material. The aircraft would be sent to holding patterns away from the incoming enemy’s approach path.
Task Force Defense: Concentration vs. Dispersion
Another element of defense was dispersion. A major topic of discussion prior to the war was whether to concentrate or disperse the carriers of a task force. Concentrating the carriers into a single task force made coordination of air strikes and CAP protection of the carriers simpler, but risked the enemy finding and sinking all of the carriers in a single strike. All navies realized the vulnerability of aircraft carriers to airstrikes based on their prewar fleet exercises. It was generally realized that the first side that spotted and attacked the enemy was likely to sink or cripple its carriers and thus win the battle.
The Japanese, with their coordinated air strikes, favored concentration in the first years of the war. They relied on hitting first to protect the carriers. Unfortunately, their inadequate search doctrine really handicapped that strategy. In the Solomons campaign, they rectified this by putting a task force with a least one battleship and light carrier out ahead of Kido Butai. They expected this to have the same effect as dispersing their carriers. They thought that the Americans would attack the first target they saw (since they lacked the discipline to continue on to the carrier task forces), thus luring them into a flak trap (the battleships). This also had the advantage of placing the Japanese search planes (from the light carrier) out ahead of the fleet where they could find the Americans first. This maximized the range advantage that Japanese planes had over American planes early in the war. In the latter half of the war, after they had (partially) rebuilt their carrier forces, they adopted a more dispersed organization, with separate task forces of no more than three carriers each.
Early in the war the Americans favored dispersion, keeping the carriers ten to twenty miles apart, close enough that the CAP over one task force could theoretically assist the other, but far enough apart for an enemy strike to (hopefully) miss one task group while attacking the other. Eventually the US Navy solved the dilemma in true American fashion. They built enough ships and planes and trained enough crews so that they could have both concentration and dispersion by operating separate task groups with multiple carriers each.
Task Force Defense: Anti-Aircraft
Shipborne anti-aircraft (AA) and evasive maneuvers were the last defenses against strike aircraft that made it past the CAP. Again, US and Japanese doctrine was different. US defense relied on heavy shipboard AA (heavier as the war went on) to shoot down the attackers, or at least spoil their aim. They kept their escorts in close to provide AA support. Evasive maneuvers were only used at the last moment to avoid individual bomb or torpedo attacks. Shipboard AA improved drastically over the course of the war, with radar directors used to concentrate fire and the introduction of the proximity (VT) fuse in July 1943.

Hornet’s 1.1-inch “Chicago Piano” anti-aircraft guns in action, May 1942.
The Japanese relied more on evasive maneuvers, partly because they (rightly) did not have as much confidence in their AA as did the Americans. Japanese escorts gave more space to the high-value units so that they were able to freely maneuver. It is questionable whether close-in support would have been any more successful, given the performance of Japanese AA. It was visually directed throughout the war.
“The Rules”
Second World War at Sea players who want to explore how historical doctrines affected naval air operations may use the following optional rules. Many of them have already been published as Special Rules in Midway Deluxe Edition and South Pacific. Players may pick and choose which ones to use; each is designed to be used separately. Note that most of what follows are not changes to the Second World War at Sea series rules, but suggestions for operating aircraft more historically within the standard rules.
Task Force Organization:
Prior to March 1942, American task forces may contain at most one CV; and separate task forces with CVs may not be plotted to approach within two zones of one another, unless entering or exiting the same port. From March to July of 1942, American task forces may contain up to two CVs, however they may still not be plotted to approach within two zones of one another, unless entering or exiting the same port. From August 1942 on, American task forces may contain up to two CVs and may not be plotted to occupy the same sea zone, unless entering or exiting the same port. After July of 1943, American task forces may contain up to six CV/CVLs and up to two carrier task forces may operate in the same sea zone. A task force may contain up to seven CVEs.
Japanese and British Task Forces may contain up to six CV/CVLs. After 1943, Japanese task forces may contain no more than three CV/CVLs.
Air Search:
Japanese players must use all available float planes (11.6) before assigning carrier-based aircraft to Search missions. When assigning carrier aircraft types to search missions, they should be assigned in the following order of preference: 1) D4Y, 2) B5N2, 3) D3A1.
Americans should assign aircraft to search missions in the following order of preference: 1) SBD and/or SB2C, 2) TBF/TBM.
Escorted searches. After July 1943, an American player may assign fighter escorts to their search aircraft. If the player elects to escort his or her air searches, he or she assigns one step of fighters for each step of Air Search aircraft. Search range is limited to the shortest range between the search and escort aircraft. Escorted Air Searches subtract one from the second die roll on the CAP Interception of Air Search Table (11.2).
Air Strikes:
Japanese aircraft from two or more carriers in the same task force may combine into one flight for a strike mission against any target. American aircraft after July 1943 and British aircraft after November 1944 from two or more carriers in the same task force may combine into one flight for a strike mission against any target. No other navy (that is, in alternate-history scenarios) may combine aircraft from different carriers into a single strike against a naval target not in port.
Any nation’s aircraft from two or more carriers in the same task force may combine into one flight for a port strike (13.4) or land strike (13.5).
Deckload Strikes: Japanese carriers may launch no more than half of their current carrier capacity (round any fraction up) in one flight. British carriers before November 1944 may launch no more than two-thirds of their current capacity (round any fraction up) in one flight. The limitation on launches includes any CAP, search or ASW patrol aircraft, if the first flight is a land or port strike launched on the first daylight turn of the day. There are two options for the remaining aircraft; players should agree beforehand which option to use:
1. The remaining aircraft stay in the Hangar Box, move up to the Ready Box in Phase XI of the launch turn, and are available for launch in the following turn.
2. The remaining aircraft are held in the Ready Box, and may be used in a second flight (in the same turn as the first flight) on any eligible mission (10.54). Strike missions may strike the same target as the first flight or any other eligible target. If this option is used, there is a risk that an enemy airstrike may attack the carriers while the second flight is still in the Ready Box. If an enemy strike attacks a carrier that conducts two launches in the same turn, the attacking player rolls one die. On a result of five or more, the strike finds the carrier before the second launch and the aircraft are caught in the Ready Box (8.23). Add one to the die roll if the strike travelled three or four zones to reach the task force; add two to the die roll if the strike travelled fewer than three zones.
If players agree to Option 2, the launching player may still elect to use Option 1 in some or all instances so that his or her second launch is protected in the Hangar Box, but may not launch until the following turn.
Task Force Defense:
Japanese CAP adds the following modifiers to the CAP Interception Table:
● Task force with less than six ships equally spaced around row Z on the Tactical Board: -1
● Second or later air strike against a single task force in each turn: -1
When resolving a naval strike (13.3), Japanese ships may only fire their AA factor at attacking aircraft in their own hex.
Radar Warning: Before an incoming strike makes its Target Location die roll (13.2), the American or British player rolls one die for each task force that is the target of a Naval Strike. On a result of 4 or greater the task force’s carriers may elect to launch any aircraft in the Ready Box (including British aircraft under the Deckload Strike rule above). The aircraft must be given a transfer mission back to their launch point. They land at the end of the current turn and are subject to the rules for returning aircraft (10.7).
You can order South Pacific right here.
Quantities are limited.
You can order Midway Deluxe Edition right here.
Sign up for our newsletter right here. Your info will never be sold or transferred; we'll just use it to update you on new games and new offers.
Want to keep Daily Content free of third-party ads? You can send us some love (and cash) through this link right here.
|