| Panzer Grenadier:
Fourth Edition Optional Rules, Part II
June 2014
Note: Panzer Grenadier’s Fourth Edition comes with optional rules. A lot of optional rules. Here they are in the second of two installments, so players can start using them right away.
Mire
Some terrain is so boggy or rough that vehicles or naval units attempting to cross it may become hopelessly caught without outside help.
Procedure
If a unit enters terrain designated by the TEC or scenario instructions as having mire potential, roll one die for the moving unit each time it enters such a hex. Unless otherwise specified, on a result of 1 through 3 for wheeled vehicles, or 1 or 2 for naval units or tracked vehicles, the unit may no longer move unless “freed” on a subsequent turn. Add one to the result for an amphibious vehicle in rice paddy/salt marsh, swamp, or water.
Place three Moved/Fired markers on the mired unit. In the marker removal phase remove one marker each turn until one remains. On the third marker removal phase make another mire die roll as above. If the result allows the unit to move, it may move normally next turn. If the unit is still not allowed to move, place another three Moved/Fired markers on the mired vehicle. Repeat the procedure as necessary.
Effects
Mired units have their armor rating reduced by one. Transports may unload while mired. Weapon units that unload must roll for mire, and if mired themselves, may not unlimber or limber. Units assaulting mired units receive a +1 column shift.
A mired unit may fire or attempt recovery but may not remove a Moved/Fired marker that turn if they do so.
Terrain Affected by Mire
Barbed Wire, Mangrove, Major River for Naval, Rice Paddy/Salt Marsh, Rocky, Sand Dune, Sandbar, Steep Slope, and Woods.
 Multi-Player Games Multi-Player Games
Panzer Grenadier may be played by more than one player per side. There are two suggested ways to do this.
Sector Command
This is the preferred option for larger multi-player games. At the start of the game, the players divide the board into sectors. Sectors can be divided board-by-board, or in any other manner agreed on. Each side then assigns a player to be commander for each sector. So, if Board 1 is Sector 1, then Sector 1 will have an Axis Sector Commander and an Allied Sector Commander.
Each turn, the opposing commanders in each sector play against each other, simultaneously with and independently of the other players. When all units in a given sector are done activating, the two sector commanders pause to see if all the other sector commanders are done activating too. When all units in all sectors are done activating, play proceeds to the next turn. This allows each turn of large multi-player games to proceed quickly, without players waiting for others to finish actions.
Each sector commander controls all friendly units in his sector, and takes command of friendly units which enter his sector from another sector. Units may not fire at targets outside their own sector, except to initiate or join an assault. This keeps players from interfering with each other’s actions. It also simulates limits to communications between sector commands in battlefield conditions.
Formation Command
This is the preferred method for smaller multi-player games, or for players who wish to command specific units in battle. Divide all of each side’s units and leaders among the side’s players in any way desired. Each player will control only those leaders and units he has been assigned, and will control them no matter where they move on the board. Game play proceeds normally, with each side taking one action segment at a time, and the player controlling the activated units moving and fighting with them as he wishes. When a player activates his units, he may NOT activate the units of another player.
Commanding Officer
Before the start of play, roll a die to see which player on each side will be that side’s Commanding Officer (CO). In Sector Command games, the CO is not represented by a leader piece on the board – the player himself is the CO. In Formation Command games, the player who wins the roll to be CO takes control of the highest-ranking leader on his side. If there is more than one leader of the highest rank on a side, designate one of the highest-ranked leaders as having seniority. At the start of each turn, the CO player may discuss battle plans with his sector commanders and give them high-level orders.
In Sector Command games, the CO can tell sector commanders to send their units to different sectors. Also, at the start of each turn he allocates air units and off-board artillery increments between his sector commanders. Each sector commander may use the air and artillery assigned to him that turn normally.
In Formation Command games, the CO player himself has control of off-board artillery and air units, and decides when and where to use them. He also decides which player gets to activate units in each friendly action segment.
CO Casualties
In Formation Command games, if the highest-ranking leader on a side is killed, the player with the next-highest-ranking surviving leader becomes the new CO. If there is a tie for seniority, the player who controls the most surviving combat unit steps is the new CO (roll a die to resolve ties).
 Overrun Overrun
An Overrun is considered a "move activation." An AFV or cavalry unit (including loaded APCs, but excluding tanks with riders) must be activated by a tank or cavalry leader respectively, and may conduct Overrun from two or three hexes away only (they may not start adjacent to the target hex), and must have enough MPs to enter at least one pre-designated exit hex AFTER the assault hex (this exit hex must be free of enemy units and not prohibited to the units attempting Overrun). The AFV or cavalry must have a LOS to the target from its starting position, and follow that LOS to the target assault hex. Inactive opposing units may conduct Opportunity Fire against the AFVs or cavalry performing an overrun in any hex it enters before entering the assault hex. Overruns may NOT be conducted into existing assault hexes.
Once the overrunning AFV(s) or cavalry enter the target assault hex, conduct the assault normally except that both sides suffer an additional -1 column shift (or -1 to Anti-Tank Fire, except foot units using Special Anti-Tank Fire (11.5) which have their initial die roll adjusted by -1 instead). If the overrunning AFV or cavalry suffers demoralization it stops moving, is marked Moved/Fired, and the hex becomes a normal assault hex for future combats at the end of the action segment. If the overrunning unit suffers disruption it moves into the designated exit hex, stops moving, and is marked Moved/Fired. If it suffers any other result it moves into the designated exit hex and, if it still has remaining MPs, may continue moving normally.
Pre-Plotted Bombardment
Every on-board artillery unit that begins the scenario unlimbered, and every off-map artillery increment, may have one location pre-plotted prior to forces being deployed on the map. Players should record the desired hex for each such artillery unit or increment. The artillery may fire at that hex on any turn bombardment fire is allowed in lieu of other targets, regardless of spotting or visibility. Fire at pre-plotted hexes receives a +1 modifier to the friendly fire roll.
 Random Events Random Events
Some games in this series include Random Events Tables. During the Initiative Determination Phase, if both players roll the same unmodified number on their initiative die roll, a random event may take place. Players roll again to see who wins initiative, and then each player rolls another die to determine the random event for the turn. Add the results together and consult the Random Events Table in the scenario book.
Recon by Fire
In situations where unspotted units are in range of artillery on the map, or in scenarios using Hidden Units, bombardment may be attempted against those hexes using the following procedure. The hex (not the units) must be spotted normally (8.0). Make the decision to combine fire or not normally (9.3). Once the firing units are chosen, roll one die for the attack. On a result of 1 or 2 the bombardment has no effect: mark the firing unit(s) Moved/Fired. On a result of 3 through 5 the hex is attacked at half the normal bombardment strength. On a result of 6 a full-strength bombardment attack is performed.
 Ruins Ruins
In any segment where a player targets a town hex with a single Direct or Bombardment Fire attack with a strength of 30 or more, the firing player rolls one die after resolving the fire against the hex. On a result is 6, the town is considered a ruin. Place a Wreck marker on the hex to denote this status. A town hex may only be reduced to ruins once per game. A ruined town is treated as a normal town hex for all purposes except as follows:
• Units entering the ruined town pay the following MP costs: Foot 2, Motorized P, and Mechanized 4.
• Only one vehicle unit may occupy a ruined town hex, and if another Wreck marker is ever placed there then no vehicle units may enter that hex for the rest of the game unless the Wreck clearing procedure is used. Wreck clearing cannot remove the marker indicating the ruined town.
Smoke and Illumination
Unless forbidden by scenario special rules, all mortars, on-board artillery units and off-board artillery increments conducting bombardment attacks have a limited ability to fire smoke or illumination rounds instead of causing damage. A unit or off-board artillery increment firing smoke or illumination may not also conduct Bombardment or Direct fire in the same turn (place a Moved/Fired marker on it, or make a note if it's an off-board artillery increment). Illumination rounds are sometimes called star shells.
Limited Ammunition
Each side in a scenario has a number of turns of smoke equal to 10 percent of the turns in the game, with fractions rounded up. So a 12-turn game allows for two rounds of smoke/illumination, while a 36-turn game would allow four turns. To track usage, place either a Smoke or Illumination marker under the firing unit to indicate one usage, or note off-board artillery’s usage on a piece of paper.
Procedure
For each unit or artillery increment firing, the active player designates a spotted target hex within range and rolls two dice. On a result of 5 or more the firing player places either a Smoke marker or an Illumination marker in the target hex. Subtract one from the result for 60mm (or smaller) mortars, and add one if the firing unit can spot the target hex.
Smoke Effects
Smoke markers block line of sight at any elevation. A hex with a Smoke marker in it becomes “limiting terrain” (8.2) and provides a -1 benefit to the occupant against Direct Fire or Anti-Tank Fire. However, any fire by a unit in the smoke hex incurs the same penalty (-1 to Direct Fire or Anti-Tank Fire).
 Illumination Effects Illumination Effects
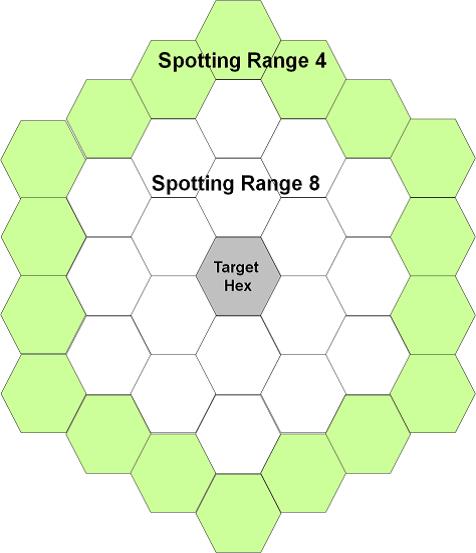
Illumination markers create a lighted area in the target hex and the surrounding hexes as indicated. Units within the primary lighted area (within two hexes of the target hex as shown) are spotted using normal spotting rules rather than night spotting rules, with a range of eight hexes maximum. The secondary lighted area (shaded in diagram) follows the same rules but uses a spotting range of four hexes maximum. These distances are maximums and may be reduced by terrain or weather conditions.
Example: At night, a unit six hexes away that has an unobstructed line of sight to the target illumination hex could spot a target in the open there, and fire upon it if desired.
Dispersal
During the marker removal phase, remove all Smoke and Illumination markers from the board.
Strategic Movement
Units out of line of sight of enemy units may move at twice their normal movement allowance. Hidden units may attack such units with opportunity fire with a +2 Direct Fire or Bombardment Fire column modifier or a +2 Anti-Tank Fire dice roll modifier.
 Tank Riders Tank Riders
A good-order personnel unit that does not have its own conveyance (like bicycles, motorcycles, or horses) PLUS up to three leaders may be transported on top of a good-order tank unit. A full-strength tank unit can transport one full- or reduced-strength personnel unit plus leaders, but a reduced-strength tank unit may only transport one reduced-strength personnel unit plus leaders. The personnel unit and/or leaders must begin the action stacked with the tank unit, and both units expend all their movement points to load. To unload costs one-half the movement points of the tank and the riders (round any fraction up), any of which may continue moving if it has sufficient movement points remaining. Tanks with riders may not initiate an Assault (12.0) or Overrun, nor fire any weapons. Tank riders suffer all the limitations and penalties of 5.6 and 5.65, and have vulnerabilities as shown on the Direct Fire and Bombardment Fire Tables.
Variable Nighttime Spotting Range
Instead of rolling a die to determine for night visibility just at the beginning of a game (8.12), roll at the start of each turn to simulate clouds affecting moon and star light.
Fourth Edition Rules
Play with them! Order a Panzer Grenadier game right here.
|